Amplify Studio / Figma / Clojurescript / Reagent Tutorial
Implements the AWS Tutorial Build a Vacation Rental Site with Amplify Studio but instead of being Javascript based, uses Clojurescript for the project implementation. It does incorporate the Javascript output of Amplify Studio but all code to use it is in Clojurescript.
Tooling Used in the project:
- Create Reagent App to create the project scaffold
- Clojurescript (The whole point of this article!)
- Shadow-CLJS as the build tool / compiler
- Webpack Key to preping JSX and JS Files from Amplify Studio and UI Components to be used with shadlow-cljs transpiled clojurescript.
- Babel Used by webpack to convert JSX to JS
- Reagent (CLJS wrapper around React) for building your user interface
- Amplify Studio and all the related AWS Amplify tooling
- Figma AWS Amplify UI Kit
Prerequisites
Setup an Amplify Studio Project
All the initial setup of the Amplify Studio Project on AWS and the associated Figma project is already described in the first part of the excellent Build a Vacation Rental Site with Amplify Studio so will not repeat it here.
That first part of the article will have you do all the following in the appropriate Web Consoles and services AWS and Figma). You won't be doing any CLI commands on your local dev computer:
- Setup an Amplify Studio project via the Amplify Sandbox
- Create a basic data model in Amplify Studio
- Deploy the start of the Amplify project to AWS
- Create some sample data
- Set up a Figma project using the Amplify UI Components and shows you how to modify it
- Import the modified Figma project into the Amplify project
- Link the data model and the UI Component in Amplify Studio
- Create a collection view using Amplify Studio
Start by following the instructions from the original article, Build a Vacation Rental Site with Amplify Studio, up thru to the section: Pull to Studio
Once you have completed that, come back to here and follow the rest of this post at this point.
Creating an Amplify Studio App with Clojurescript
This is the actual instructions on how to create your Amplify Studio app in Clojurescript instead of Javascript. It replaces the remainder all the content after Pull to Studio from the original article Build a Vacation Rental Site with Amplify Studio.
Create a git repo with shadow-cljs / reagent scaffolding
Instead of using create-react-app that would have created a Javascript/React app, we’re going to use create-reagent-app to create the scaffolding of a shadow-cljs / reagent / react app repo.
In this tutorial, we will make this a git repo and snapshot the state at every stage so that if you make a mistake you can go back to an earlier step.
npx create-reagent-app  amplifystudio-cljs-tutorial
cd amplifystudio-cljs-tutorial
git init
git add -A
git commit -m "Initial Commit after create-reagent-app"
npm-install
Add webpack and related dependencies
Shadow-cljs can not directly consume JSX files that are the output of the Figma plugin and it needs some help to incorporate the AWS UI Components files that Amplify Studio injects into the project.
The use of Babel to prepare JSX files for Shadow-cljs is based on info from Shadow CLJS User’s Guide - JavaScript Dialects. This tutorial moves the babel management into webpack configuration as described later on.
The following dependencies are needed primarily to install webpack and its dependencies.
html-webpack-plugin and html-beautifier-webpack-plugin are used to inject the proper JS include for the output of webpack into the index.html.
npm i -D @babel/cli @babel/core @babel/preset-react @babel/preset-env babel-loader html-webpack-plugin html-beautifier-webpack-plugin process webpack webpack-cli
Then update any dependencies to the latest versions If you don’t already have it, install npm-check-updates
npm install -g npm-check-updates
And then run it to update any dependencies to the latest versions ignoring specified versions in the package.json.
I like to start projects with the latest versions of everything. But you could just make sure shadow-cljs is the latest version, best to stay latest with that.
If you run it without the -u it will just show you what it would update and you could manually update the ones you care about.
ncu -u
npm install
Update your local git repo
git add -A
git commit -m "Snapshot after adding webpack dependencies"
If you want, you could push it to your own remote Github or other repository
Add AWS Dependencies
- AWS Account
- If you don’t already have an AWS account, you’ll need to create one in order to follow the steps outlined in this tutorial. Create an AWS Account
- Amplify CLI If you don’t already have the Amplify CLI installed you can install it with
npm install -g @aws-amplify/cli
- Configure Account / IAM / CLI to work with Amplify If you already have an AWS account you want to use and you have things setup in your workstation / Terminal to use AWS CLI via profiles in ~/.aws/credentials, you can just set your profile in your terminal for the profile to use
export AWS_PROFILE=<your profile>
and you don’t need to do amplify configure.
If you haven’t set up aws amplify on your local dev machine before, follow the instructions at Configure the Amplify CLI
Install the aws-amplify libraries in your project
Still at the top of the amplifystudio-cljs-tutorial repo, install the libraries
npm i aws-amplify @aws-amplify/ui-react
You might want to commit the changes to git just as a snapshot in case the next step messes anything up.
git commit -a -m "After adding amplify deps"
Sync repo with Amplify project
Using the amplify CLI, pull the project info and ui-components into your repo.
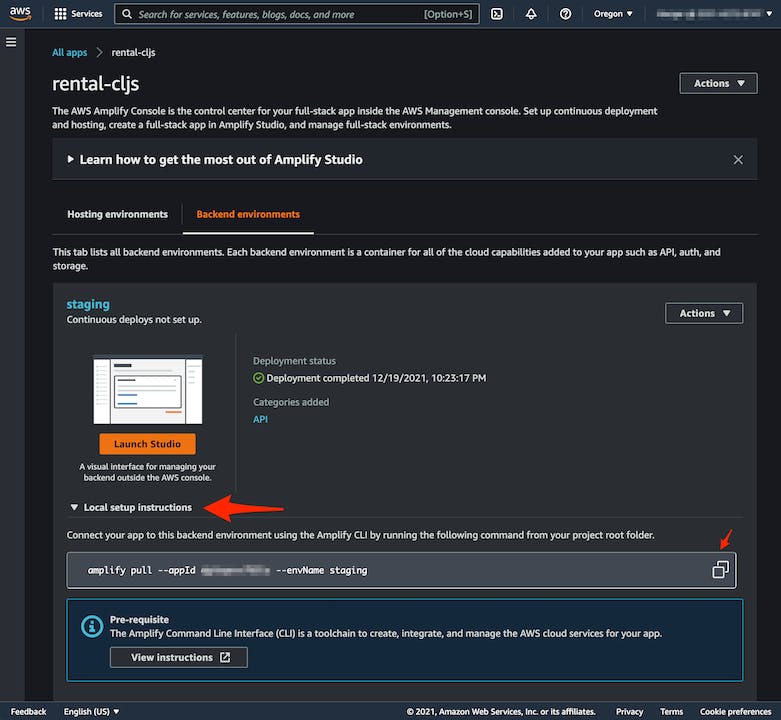
You’ll get the command to do this from your Amplify Apps page that was created earlier.

If you are using an AWS account via IAM, you should log in to your AWS Console on your default browser. The following command is going to open up your default browser to authenticate to AWS.
If you are not using AWS IAM for auth, but are using the Amplify Console that has its own username/password style login, you don’t need to do anything in advance.
DON’T TYPE THIS EXACT LINE Use the line from your environment as it has the appID for your application The following line is just an example
amplify pull --appId dgt42342sdv765la --envName staging
This will eventually open a browser page to authenticate the process. As mentioned earlier, if you are using IAM for access, its easiest if you logged into the AWS Console with your browser first. If you forget to do this, you can still login now, and copy and past the link shown in the output of the CLI command and it will retry authenticating.
If you are using the Amplify Studio username/password, you will get that dialog on the browser and you can fill it in and click Yes

It will then prompt you for a bunch of things to set up your amplify project in this repo
Opening link: https://us-west-2.admin.amplifyapp.com/admin/dgt42342sdv765la/staging/verify/
✔ Successfully received Amplify Studio tokens.
Amplify AppID found: dgtkqevv765la. Amplify App name is: rental-cljs
Backend environment staging found in Amplify Console app: rental-cljs
? Choose your default editor:
  Android Studio
  Xcode (Mac OS only)
  Atom Editor
  Sublime Text
  IntelliJ IDEA
  Vim (via Terminal, Mac OS only)
❯ Emacs (via Terminal, Mac OS only)
(Move up and down to reveal more choices)
Of course the only choice that makes sense is Emacs 🤓 (Note even though it says via terminal, it works fine with GUI Emacs)
? Choose the type of app that you're building (Use arrow keys)
  android
  flutter
  ios
❯ javascript
Keep javascript
? What javascript framework are you using (Use arrow keys)
  angular
  ember
  ionic
❯ react
  react-native
  vue
  none
Keep react
? Source Directory Path:  src/amplify
? Distribution Directory Path: public
? Build Command:  npm run-script build
? Start Command: npm run-script start
Enter src/amplifyfor Source Directory Path
NOTE: we're going to send the amplify JSX/JS files to a directory that is NOT in the clojurescript classpath
Enter public for Distribution Directory Path
This build puts everything in public but other scaffolding or cljs projects may use some other path. It should be the same as the directory above js in the output-dir parameter in shadow-cljs.edn
You can keep the defaults for Build Command and Start Command
The rest of the config inputs and outputs:
✔ Synced UI components.
GraphQL schema compiled successfully.

Edit your schema at /Users/rberger/work/aws/amplifystudio-cljs-tutorial/amplify/backend/api/rentalcljs/schema.graphql or place .graphql files in a directory at /Users/rberger/work/aws/amplifystudio-cljs-tutorial/amplify/backend/api/rentalcljs/schema
Successfully generated models. Generated models can be found in /Users/rberger/work/aws/amplifystudio-cljs-tutorial/src/main
? Do you plan on modifying this backend? (Y/n) Y
Say Y for Do you plan on modifying this backend?
You might want to checkpoint your git repo again after this.
git add -A
git commit -m "After pulling Amplify Studio project"
You can make sure the basic reagent setup is still working by doing:
npm start
The first time you run this, it will take a while to download all the Clojurescript / Clojure dependencies.
And see that the app is running at http://localhost:3000
You will just see Create Reagent App on the page as a header.

Update to support mixing webpack with shadow-cljs
Based on David Vujic’s work Agile & Coding: Hey Webpack, Hey ClojureScript we’re going to add mechanisms to build the javascript code using webpack and the clojurescript code with shadow-cljs. This is necessary when using more recent versions of the AWS Amplify libraries.
Make sure Shadow-cljs dependencies are up to date
In shadow-cljs.edn make sure that the dependencies are up to date (you can check for the latest versions at Clojars)
 :dependencies
 [[reagent            "1.1.0"]
  [binaryage/devtools "1.0.4"]]
Shadow-cljs js-options
Add the following lines to shadow-cljs.edn between the :asset-path and :modules stanzas in the :app section as per Thomas Heller's article
How about webpack now?
   :js-options {:js-provider    :external
                :external-index "target/index.js"}
Make a template from index.html
Webpack will be used to update index.html with the proper script include that points to the webpack bundle.
Move public/index.html to public/index.html.tmpl
mv public/index.html public/index.html.tmpl
Edit public/index.html.tmpl
- Add
deferto the main script tag
Change:
<script src="/js/main.js"></script>
To:
<script defer src="/js/main.js"></script>
Add in a sytlesheet for the fonts
- Add the following line after the other
linktags in<head>
<link
  rel="stylesheet"
  href="https://fonts.googleapis.com/css?family=Inter:slnt,wght@-10..0,100..900&display=swap"
/>
Copy the Amplify CSS to public
Note that the source is styles.css (plural) and the destination is style.css (singular)
cp node_modules/@aws-amplify/ui/dist/styles.css public/css/style.css
Update the scaffold Clojurescript code to support Amplify
Here's where we actually get to the actually writing of some code to use the Amplify UI Components in an App.
Edit src/main/amplifystudio_cljs_tutorial/app/core.cljs with the following changes
Add the dependencies for the require
Add the aws amplify and ui imports to the require so it looks like:
Note that the amplify pull will populate src/amplify/ui-components and the webpack execution described further on, will set things up so the "ui-components/CardACollection" require can be fulfilled.
src/amplify should NOT be in the clojure[script] class path (usually set in shadow-cljs.edn :source-paths map)
(ns amplifystudio-cljs-tutorial.app.core
  (:require [reagent.dom :as rdom]
            ["/aws-exports" :default ^js aws-exports]
            ["aws-amplify" :refer [Amplify] :as amplify]
            ["@aws-amplify/ui-react" :refer [AmplifyProvider]]
            ["ui-components/RentalCollection" :default RentalCollection]))
Update the app function
This is the actual initial page code that is run by the render function. It is primarily hiccup syntax.
Hiccup describes HTML elements and user-defined components as a nested ClojureScript vector.
- The first element is either a keyword or a symbol
- If it is a keyword, the element is an HTML element where (name keyword) is the tag of the HTML element.
- If it is a symbol, reagent will treat the vector as a component, as described in the next section.
- If the second element is a map, it represents the attributes to the element. The attribute map may be omitted.
- Any additional elements must either be Hiccup vectors representing child nodes or string literals representing child text nodes.
This code:
- Displays an
h1header - Wraps the
RentalCollectionwe created in Figma / ui-components with theAmplifyProvider
The :> is a function, adapt-react-class, that tells hiccup/reagent to interpret the next symbol as a React Component.
More info at: React Features in Reagent
The app function:
(defn app []
  [:> AmplifyProvider
  [:h1 "Amplify Studio Tutorial"]
   [:> RentalCollection]])
For comparison here is the equivalent Javascript:
function App() {
  return (
    <AmplifyProvider>
      <RentalCollection />
    </AmplifyProvider>
  );
}
Update the main function
This function is the first code called in the program. It is where you would put any initialization code and then it calls the render function that kicks of the reagent/react event loop.
- Add a bit of logging so we can see that we're hitting the code at runtime
- Add the Amplify initialization code.
(defn ^:export main []
  (js/console.log "main top")
  (-> Amplify (.configure aws-exports))
  (render))
In the Clojurescript statement:
(-> Amplify (.configure aws-exports))
-> is the thread-first macro. In this case it means that Amplify will be passed in as the second argument of the following form. I.E. its the equivalent to this Clojurescript statement:
(.configure Amplify aws-exports)
In ether case, it is the Javascript interop equivalent to:
Amplify.configure(config);
Setup Webpack / Babel
Babel config file
Babel does the work of converting JSX files to Javascript files suitable for consumption by webpack and shadow-cljs. It is called by webpack.
Create the file .babelrc in the top level of the repo with the content:
{
  "presets": ["@babel/preset-env", "@babel/preset-react"]
}
This tells babel to run the presets:
@babel/preset-env is a smart preset that allows you to use the latest JavaScript without needing to micromanage which syntax transforms (and optionally, browser polyfills) are needed by your target environment(s). This both makes your life easier and JavaScript bundles smaller!
and
@babel/preset-react loads the following plugins:
@babel/plugin-syntax-jsx - enables parsing of JSX @babel/plugin-transform-react-jsx - transform JSX to Javascript @babel/plugin-transform-react-display-name - Set displayName in the Javascript
And with the development option Classic runtime adds:
@babel/plugin-transform-react-jsx-self - sets
selfin the transformed code @babel/plugin-transform-react-jsx-source - injects the source information (file, lineno) into the the Javascript
Webpack configuration file
At its core, webpack is a static module bundler for modern JavaScript applications. When webpack processes your application, it internally builds a dependency graph from one or more entry points and then combines every module your project needs into one or more bundles, which are static assets to serve your content from.
We are using it to convert the JSX ui-component files from Figma/Amplify Studio into vanilla Javascript via babel.
Webpack is also being used to bundle the src/amplify/models and src/amplify/ui-components directories/files that are pulled from amplify into the repo as modules so that their objects can be imported into the app. This is configured in the resolve block below.
This will be a webpack configuration file, webpack.config.js in the top level of the repo. The following will describe the elements we're going to use in that file.
Requires
The following requires the webpack modules and plugins used
const path = require("path");
const webpack = require("webpack");
const HtmlWebpackPlugin = require("html-webpack-plugin");
const HtmlBeautifierPlugin = require("html-beautifier-webpack-plugin");
Basic Webpack config
- Set mode to development
entry- The file generated by shadow-cljs describing all the require/imports seen in the codeoutput- Where webpack should put its final bundle of javascript that will be included by a<script>tag in the index.htmldevtool- Tells webpack to generate source maps to be consumed by the browser devtools
module.exports = {
  mode: "development",
  entry: "./target/index.js",
  output: {
    path: path.resolve(__dirname, "public"),
    filename: "js/libs/bundle.js",
    clean: false,
  },
  devtool: "source-map",
Rules
This is the main directives that tell weback what to do.
test: /\.m?js/,- Regex that specifies what file types to apply to the first rule to (ones that end with.mjsor.js)fullySpecified: false- the import / require statements should not end with file suffixesalias- Maps the path to the javascript files to a module name. This allows the code to require the Amplify Studiomodelsandui-componentsas importable modules.
test: /\.jsx$/- Regex that specifies which file types to apply to the second rule (JSX files)exclude- Don't apply it to files installed by npm in/node_modules/use- Apply babel to the JSX files. The.babelrcfile specified earlier tells babel to transform the JSX files to vanilla javascript
    rules: [
      {
        // docs: https://webpack.js.org/configuration/module/#resolvefullyspecified
        test: /\.m?js/,
        resolve: {
          fullySpecified: false,
          alias: {
            models: "../src/amplify/models/index.js",
            "ui-components": "../src/amplify/ui-components",
          },
        },
      },
      {
        test: /\.jsx$/,
        exclude: /node_modules/,
        use: ["babel-loader"],
      },
    ],
Plugins
This is where plugins are loaded.
process- This was needed as webpack 5 no longer includes a polyfil for theprocessNode.js variable. There were some dependencies that requiredprocess.env- HtmlWebpackPlugin - Enables creating
public/index.htmlfrom a temlate so that webpack can inject the path to its bundle into the index.html. Also useful if you want to automate the updates of the index.html for other things. - HtmlBeautifierPlugin Cleans up the index.html with proper newlines mainly
  plugins: [
    new webpack.ProvidePlugin({
      process: "process/browser",
    }),
    new HtmlWebpackPlugin({
      template: "./public/index.html.tmpl",
      filename: "index.html",
    }),
    new HtmlBeautifierPlugin(),
  ],
The Html plugins / index.html templating are not totally necessary. You could just add your own script tag to index.html instead such as:
<script defer src="js/libs/bundle.js"></script>
The full webpack.config.js
Create a file webpack.config.js also at the top level of the repo with the content:
const path = require("path");
const webpack = require("webpack");
const HtmlWebpackPlugin = require("html-webpack-plugin");
const HtmlBeautifierPlugin = require("html-beautifier-webpack-plugin");

module.exports = {
  mode: "development",
  entry: "./target/index.js",
  output: {
    path: path.resolve(__dirname, "public"),
    filename: "js/libs/bundle.js",
    clean: false,
  },
  devtool: "source-map",
  module: {
    rules: [
      {
        // docs: https://webpack.js.org/configuration/module/#resolvefullyspecified
        test: /\.m?js/,
        resolve: {
          fullySpecified: false,
          alias: {
            models: "../src/amplify/models/index.js",
            "ui-components": "../src/amplify/ui-components",
          },
        },
      },
      {
        test: /\.jsx$/,
        exclude: /node_modules/,
        use: ["babel-loader"],
      },
    ],
  },
  resolve: {
    extensions: ["", ".js", ".jsx"],
  },
  plugins: [
    new webpack.ProvidePlugin({
      process: "process/browser",
    }),
    new HtmlWebpackPlugin({
      template: "./public/index.html.tmpl",
      filename: "index.html",
    }),
    new HtmlBeautifierPlugin(),
  ],
};
Add a script to run webpack
Add the following line to the ”scripts” section of package.json. It will allow you to run a that will update the bundle automatically when you change any of the amplify files or when shadow-cljs updates the target/index.js
"pack": "webpack --watch"
Update git
Update .gitignore
add the following to .gitignore
/target/
Add all the new files to the commit
git add -A git commit -m "Sync up all the final changes"
Running the development service locally
Start the shadow-cljs watch process. (shadow-cljs watch app) using the npm command:
npm start
And in another terminal window, also at the top of the repo run the webpack watch process:
npm run pack
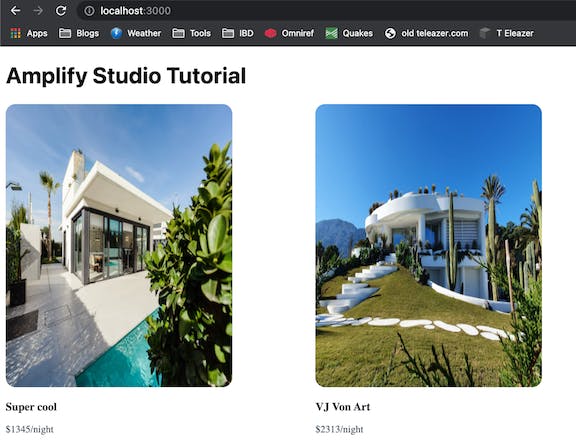
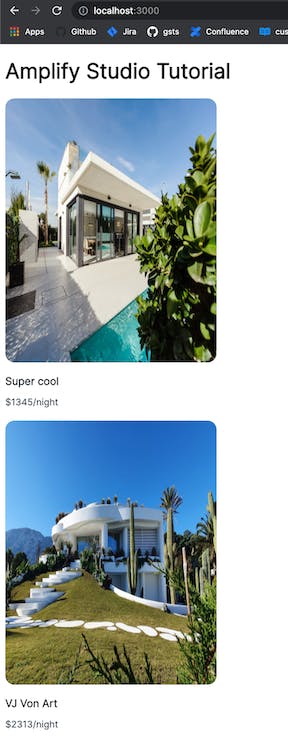
Should see something like the following. The images and values are dependent on how you set up the data when following along with the first part of the Build a Vacation Rental Site with Amplify Studio.

Troubleshooting
If when you start the shadow-cljs process, npm start, and you get something like:
...
shadow-cljs - watching build :app
[:app] Configuring build.
[:app] Compiling ...
[2022-01-02 21:55:15.214 - WARNING] :shadow.cljs.devtools.server.util/handle-ex - {:msg {:type :start-autobuild}}
AssertionError Assert failed: (map? rc)
...
The js-provider :external config in shadow-cljs.edn is masking the actual error. In order to see what the error is, comment out the :js-options block in shadow-cljs.edn like:
:builds
 {:app
  {:target     :browser
   :output-dir "public/js"
   :asset-path "/js"
   ;; :js-options {:js-provider    :external
   ;;              :external-index "target/index.js"}
   :modules    {:main
                {:init-fn amplifystudio-cljs-tutorial.app.core/main}}}
and then run npm start again and see what the error is. Correct the error and then remember to uncomment the :js-options block.
Completing the Tutorial with Amplify UI Overrides
We pick back up the original tutorial at the Use a Prop section to show how the UI Components can be customized just with Component Props and runtime Overrides.
Overrides are a powerful feature that are builtin to the Amplify UI Components and allow you to inject attributes into the children of components at runtime. It makes the Amplify UI Components very flexible without having to modify the actual code of the components. This allows you to update the Figma design aspects and still update your local copy of the ui-components with an amplify pull since you don't make local changes to that code.
Use a Prop
You can customize these React components in your own code. First, you can use props in order to modify your components. If you wanted to make your grid of rentals into a list, for example, you could pass the prop type="list" to your RentalCollection.
In Javascript you would say:
<RentalCollection type="list" />
and in Clojurescript:
[:> RentalCollection {:type "list"}]
And that will make the view go from a grid to a list:

The props are listed for each component type at Amplify UI Connected Components
Use an Override
Overrides allow you to inject props into the children of a component.
In our example RentalCollection, the images in the child cards are kind of squashed. To fix that we want to set the objectFit prop of the image element of the card to cover.
In Javascript you would use:
<RentalCollection
  type="list"
  overrides={{
    "Collection.CardA[0]": {
      overrides: {
        "Flex.Image[0]": { objectFit: "cover" },
      },
    },
  }}
/>
In Clojurescript we use:
[:> RentalCollection {:type "list"
                      :overrides {"Collection.CardA[0]"
                                  {:overrides {"Flex.Image[0]"
                                               {:object-fit "cover"}}}}}]])
Now the images are no longer squished:

Themes and Conclusion
That completes showing the differences of using Clojurescript instead of Javascript with Amplify Studio and Amplify UI Connected Components.
You can refer back to the original AWS Tutorial Build a Vacation Rental Site with Amplify Studio for the remaining content on how to use the AWS Amplify Theme Editor in Figma to add a theme to the UI Components. This should work without having to change any of your Clojurescript code as you modify the Ui component code that you load via amplify pull via Figma.
It is also possible to apply themes directly in your code. Doing that with Clojurescript will be left to a possible future article.
The full project / code for this repo is at {% github rberger/amplifystudio-cljs-tutorial no-readme %}
Feel free to post issues or questions there.

