AWS Amplify and Clojurescript Re-Frame Part 2

As the Chief Architect, Rob guides the evolution of the InformedIQ Software and Infrastructure. His experience spans the rise and fall of many technology lifecycles from machine vision, digitization of professional video production equipment, Internet Infrastructure, Wireless, E-commerce, Big Data, IoT, DevOps and Machine Learning. He has been a founder or a technical leader in several startups in Silicon Valley.
Previously: CoFounder / CTO / SVP of Engineering at Omnyway, Rob is leading the software development and infrastructure efforts of Omnyway Inc. His long history as an early adopter of DevOps, Lean culture and Cloud technology drives Omnyway’s continuous integration / continuous delivery workflow and operations.
Prior to Omnyway, Rob was the Cloud Architect at Mist Systems Inc (http://www.mist.com), where he designed, and led the implementation of the Cloud / Realtime big data Infrastructure and Continuous Delivery process. Mist’s mission is transforming the Indoor Location and WiFi Experience.
From 2008 to May 2013, Rob was a co-founder and the CTO of Runa Inc., developing and deploying a Big Data Cloud based Software as a Service for online merchants. Runa increases conversion of shoppers while on the merchant's site using real-time, individualized promotions. While at Runa he pushed the state-of-the-art in personalization, service scaling, statistical / semantic processing and ajax technologies. Our system architecture includes the use of AWS, HBase/Hadoop, Clojure, AMQP/RabbitMQ, Redis and Opscode Chef. Runa was sold to Staples in 2013.
As the President and Founder of Internet Bandwidth Development since 1998 and as a principal at Opscale from Apr 2013 - Sept 2014, Rob has delivered hands-on design and development to many SaaS, IaaS, PaaS and Big Data companies in Silicon Valley. He has helped them deploy their services, improve their monitoring and implement Continuous Delivery on a variety of Private and Public Cloud / Virtualization Environments. He has created several custom deployment, CI, monitoring and management tools.
Rob has been a principal or founder in several other start-up network services and equipment companies including InterNex, MetroFi and UltraDevices. As an Internet pioneer in the early 90’s, Rob founded InterNex Services which was the first ISP to offer commercial ISDN Internet services, Frame Relay and higher speed business broadband services as well as one of the first o offer shared, dedicated and International Hosting Services. InterNex was later acquired by Concentric/XO.
In 2002 - 2003 Rob was a visiting research fellow at the Center for Global Communications (GLOCOM www.glocom.ac.jp) in Tokyo with a focus on Open Spectrum technology (UltraWideband spread spectrum, Cognitive / Software Defined Radios, Wireless Mesh Networks, expanded unlicensed 802.11 wireless) and how it impacts spectrum policy.
Over the years Rob has provided technology consulting in Architecture, Due Diligence & Design Review/Evaluation in the realms of backbone networks, access networks, wireless networks, DevOps, software development and innovative Internet/Web applications and services to technology start-ups, top names in Internet hardware and software, as well as venture capital firms, including NEA, Athena Ventures and Panorama Capital.
Companies Rob has worked with as a consultant or advisor include Staples Labs, RFSpot, Continuuity, ElasticBox, Deutsche Telekom Hosted Business Services, Equilar, RiverMeadow, SkyPilot Networks, VISA, Cisco, Ascend, iPass, and Oki Networks. Through IBD he has provided services Rob has been on the Advisory Boards of companies including Netenrich, Vistara, TelTel, Covad, Alteon WebSystems (acquired by Nortel), AboveNet, WeFi, BooRah, GridNetworks, Cloudscaling, Support Intelligence, Cosine Communications and most recently Compass (http://compass.co).
He has been a speaker on Next Generation Networks and DevOps / Cloud Technologies at conferences including RedDotRuby Singapore, HBaseCon, CTIA and APRICOT (Asia Pacific Regional Internet Conference on Operational Technologies).
Introduction
Now that our Re-Frame app is running, let's deploy it to "production" on AWS Cloudfront using Amplify Console.
The Amplify Console allows you to do a CI style deployment from your git repo with almost no work on your part.
Setup Amplify Console
Connect your repo to the Amplify Console
- Use your web browser to go to https://console.aws.amazon.com/amplify/home
If you have no previous Amplify Deployments you will see:
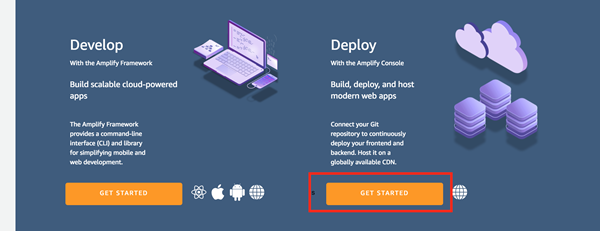
- You should select the Get Started under Deploy
Select the appropriate Git service (We used Github)
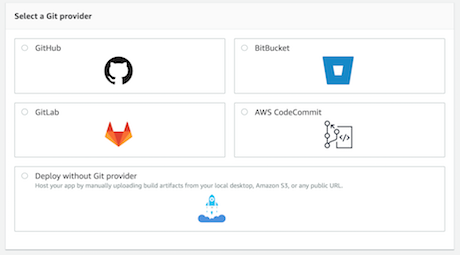
- It will then go thru the process of allowing you to authenticate that the Amplify service can have the appropriate access to your github repos for the github account/organization you enable
- Will then prompt you for the actual repo and branch you want to build and deployments
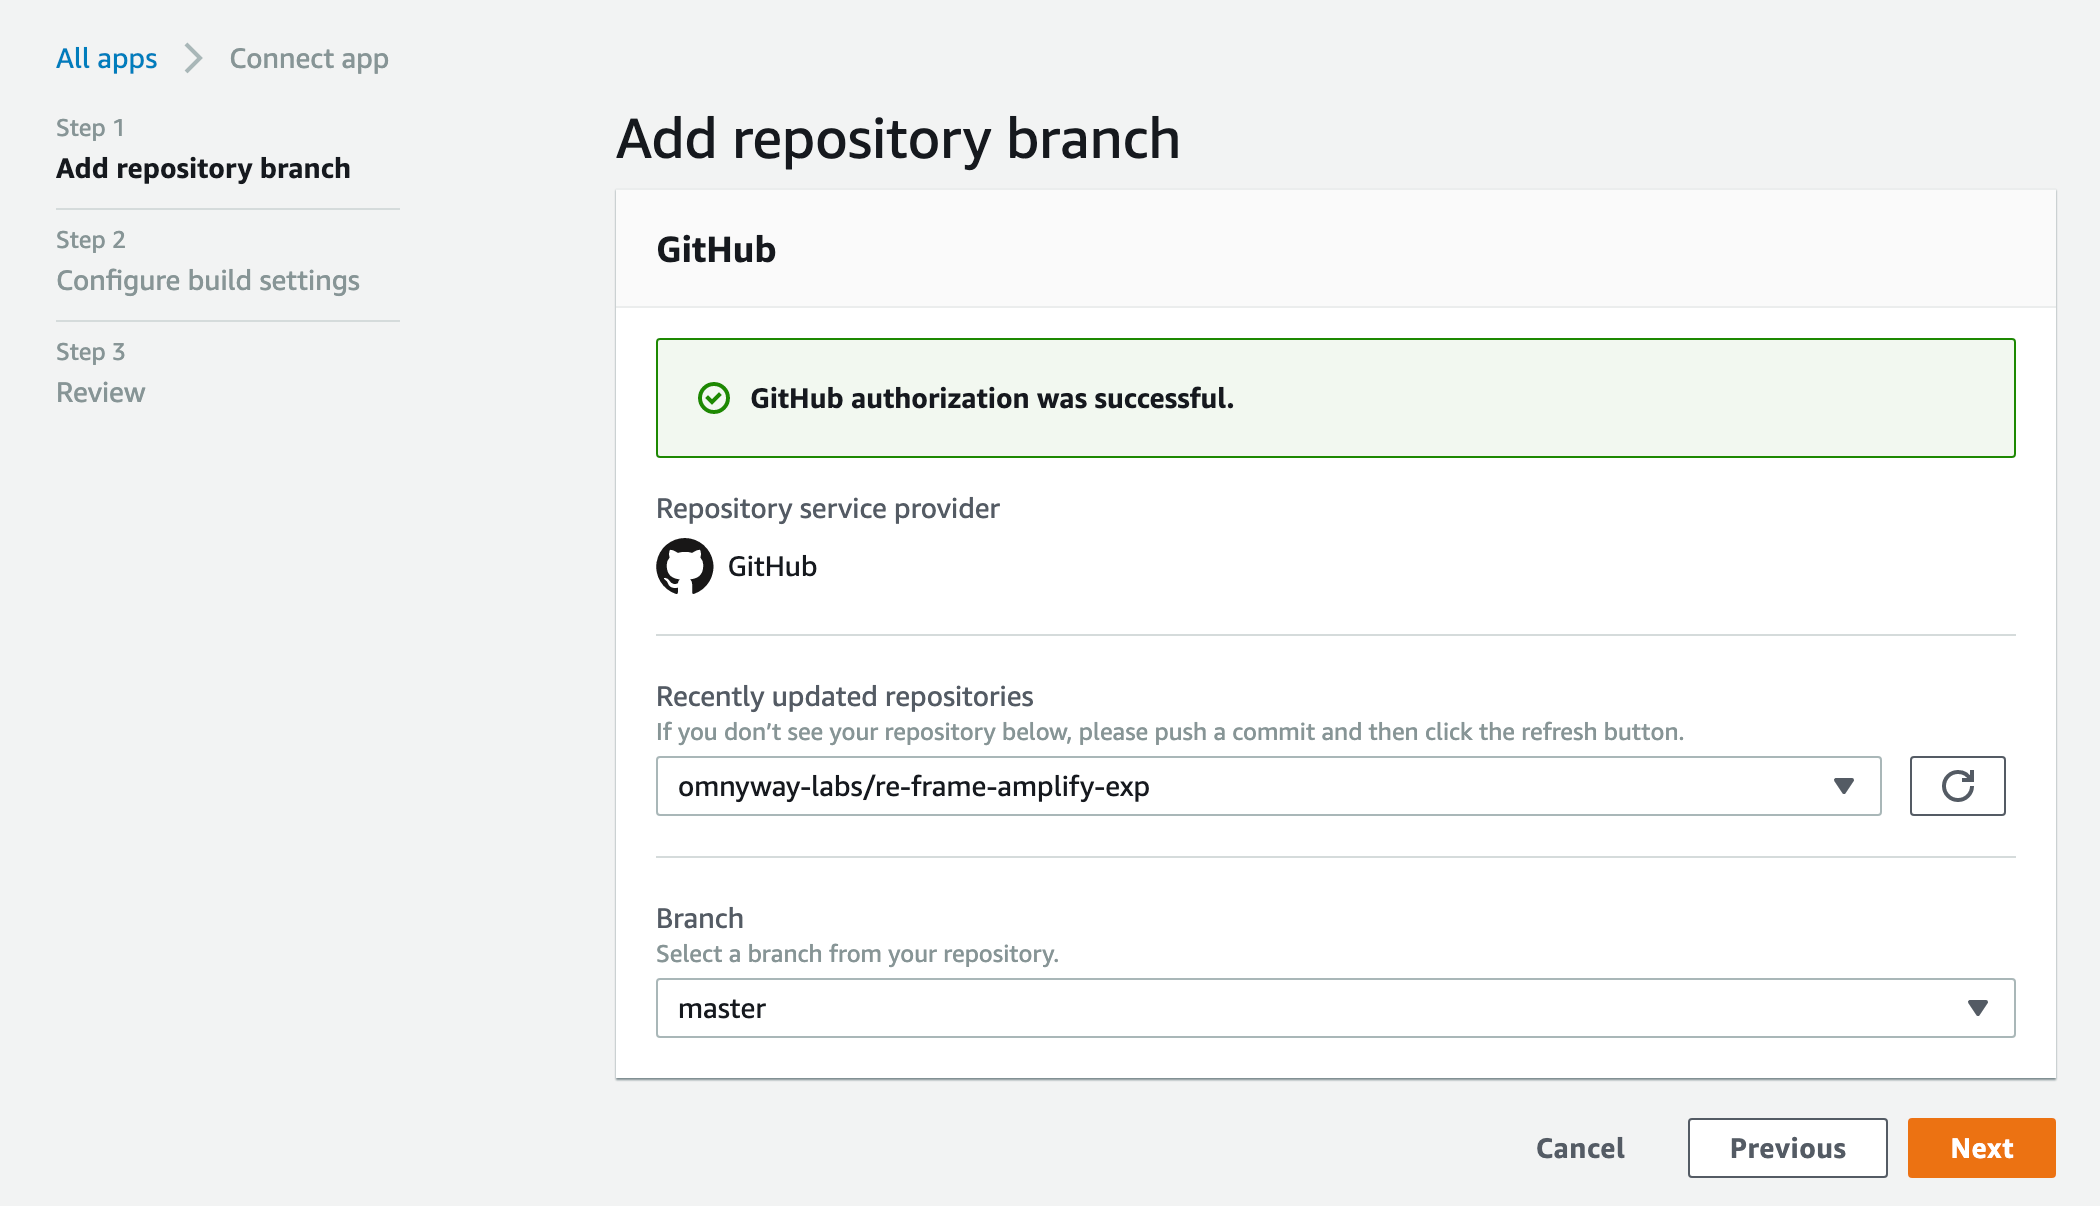
- Click NEXT
Note: The previous article Add Serverless AWS Amplify Authentication to a Clojurescript Re-Frame App and this current article are based on branch basic-amplify-with-cloudfront of the omnyway-labs/amplify_cljs_example repo
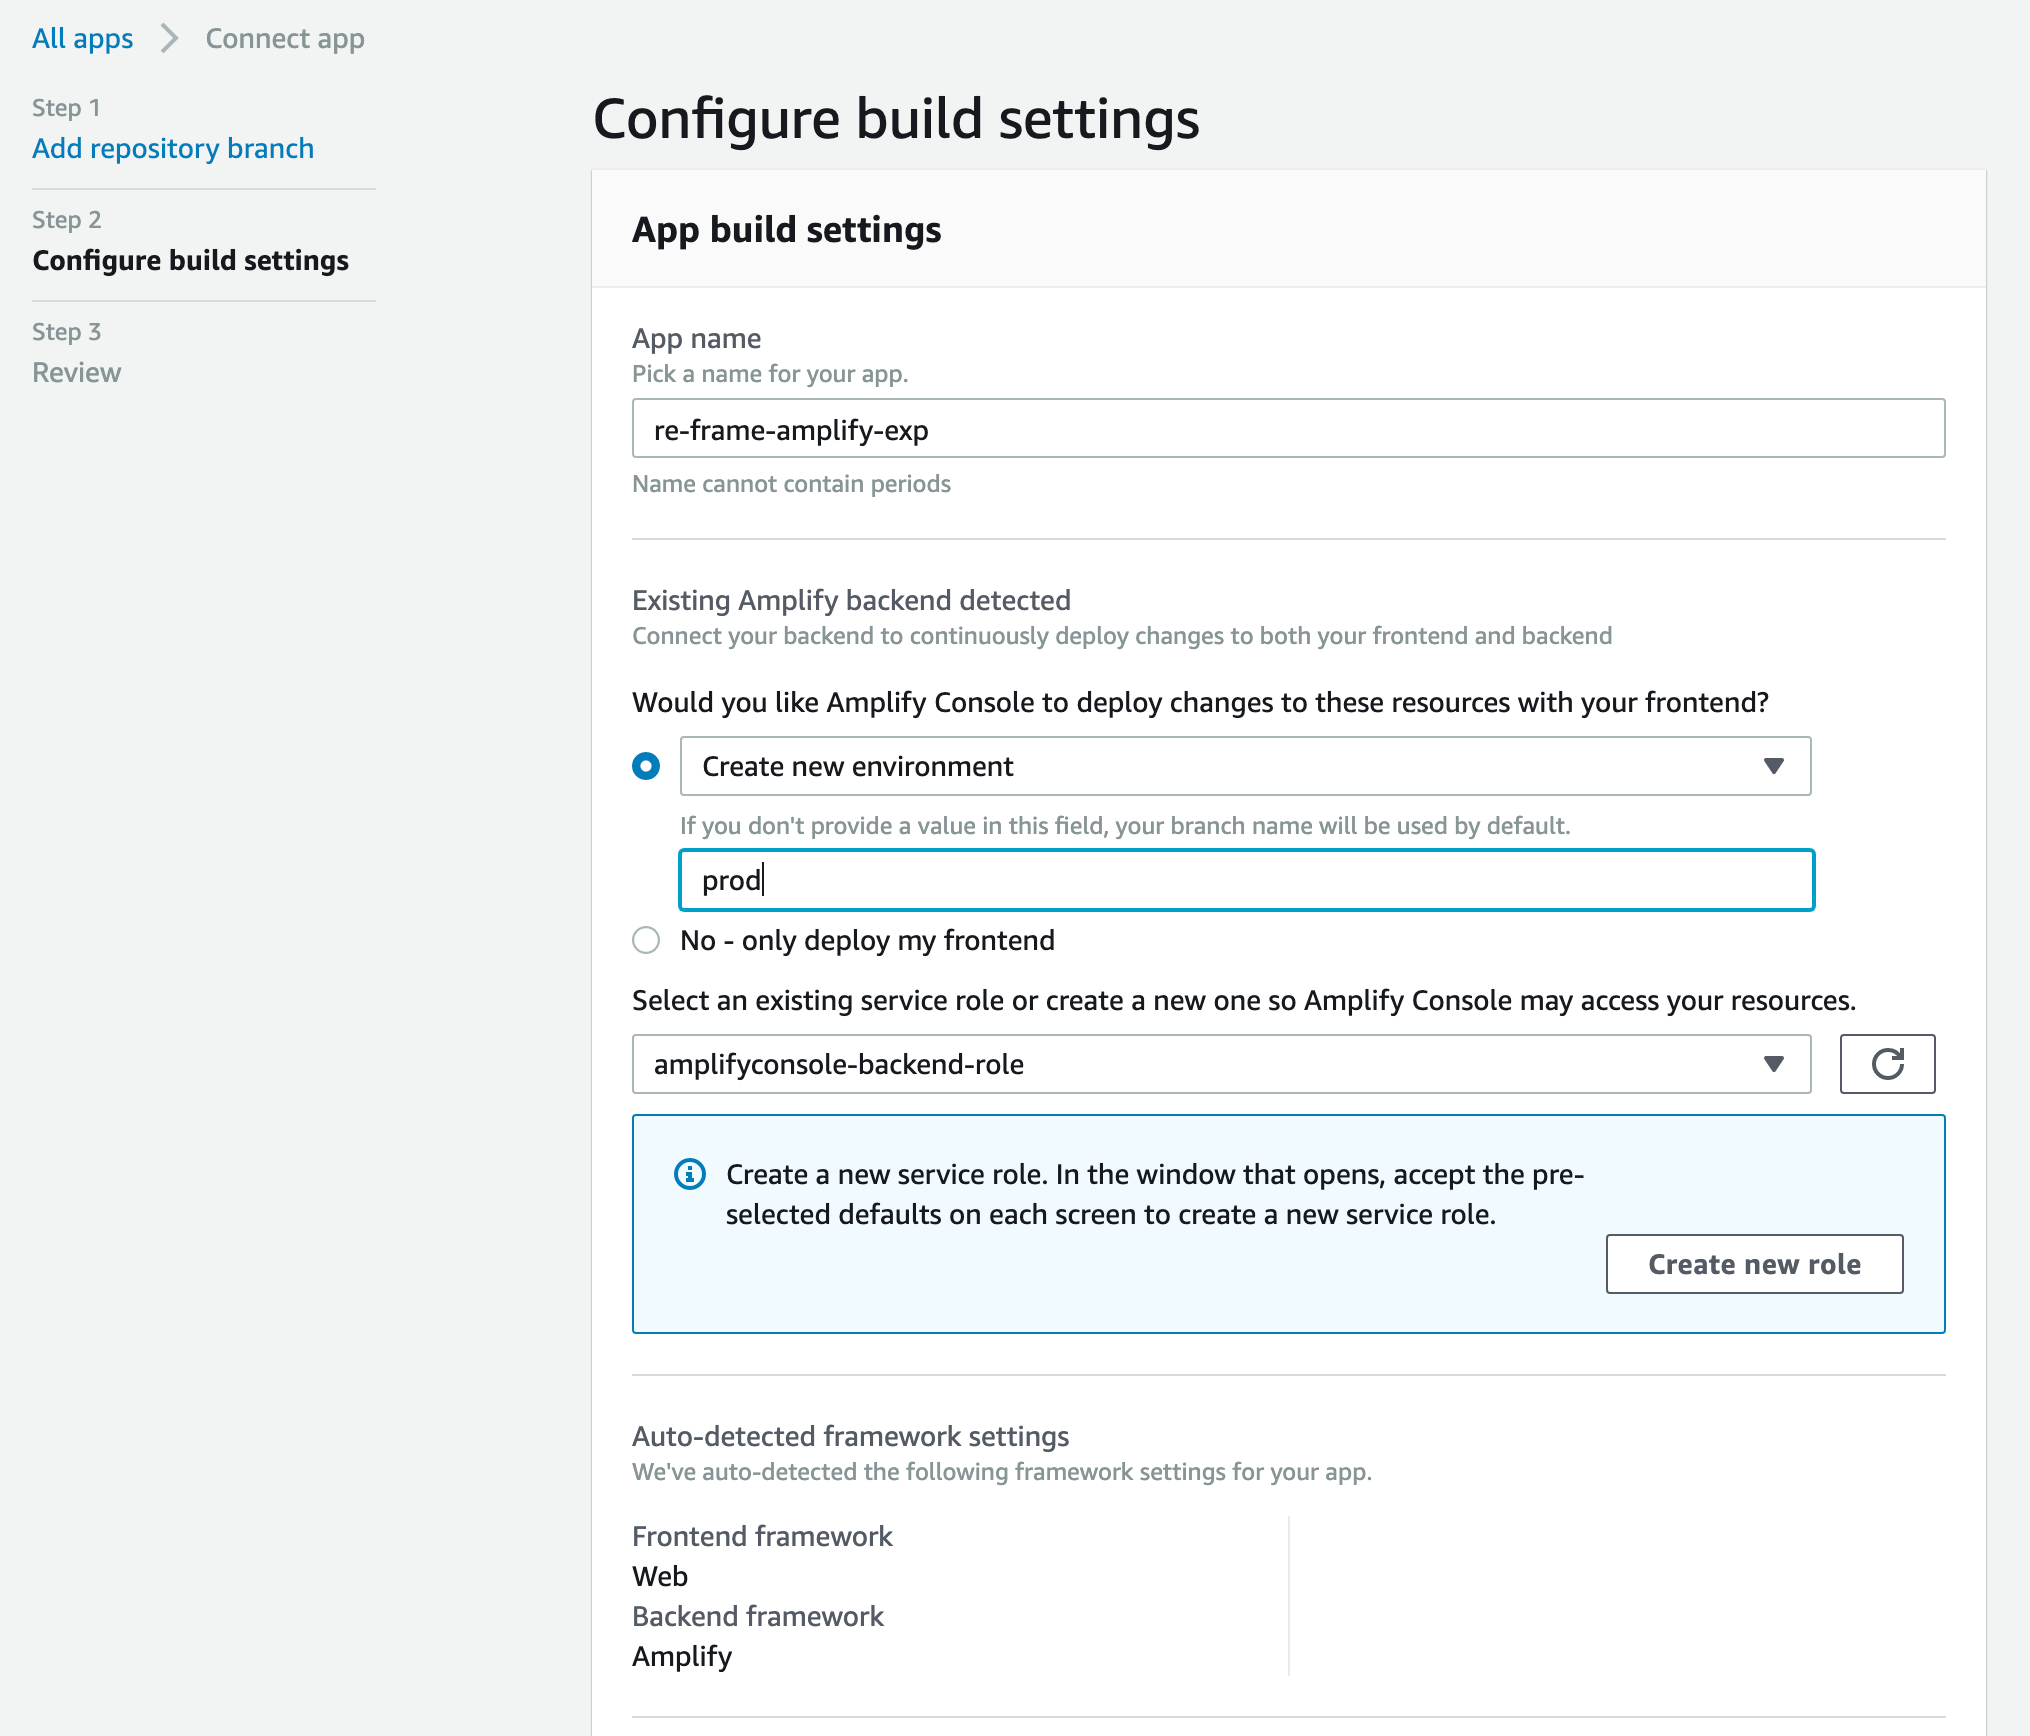
Configure Basic and Backend build settings
The Backend is the AWS services that were created using the Amplify CLI. For us that was the Authentication service.
The Frontend is our Web App.
- You will see the following:
- Change the
App nameif you want
- Change the
Backend Deployment Options
- You have the choice under
Would you like Amplify Console to deploy changes to these resources with your frontend?to:- Not have it automatically deploy the backend along with your frontend
No - only deploy my frontend
- Deploy the same backend for prod as you are using in the dev environment
- Select
devand notCreate new environment
- Select
- Deploy a different copy of the backend from your dev environment
- Select
Create new environment - Fill in the name of the new environment. In our case
prod
- Select
- Not have it automatically deploy the backend along with your frontend
Service Role
This is the role that the Amplify Console runs as when setting up your backend services on AWS
- If this is the first time thru, you should
- Click Create new role
- Go thru the pages and accept the pre-selected defaults on each page and create the new service role
- Click the Refresh option
- Use the pulldown to select the role you created
- Click Create new role
- If it wasn't the first time, select the role that already exists
Build Settings
This is the CI Commands to build and deploy your app. It has the default YAML file that at a minimum requires you to set the Frontend build commands and the build output directory. 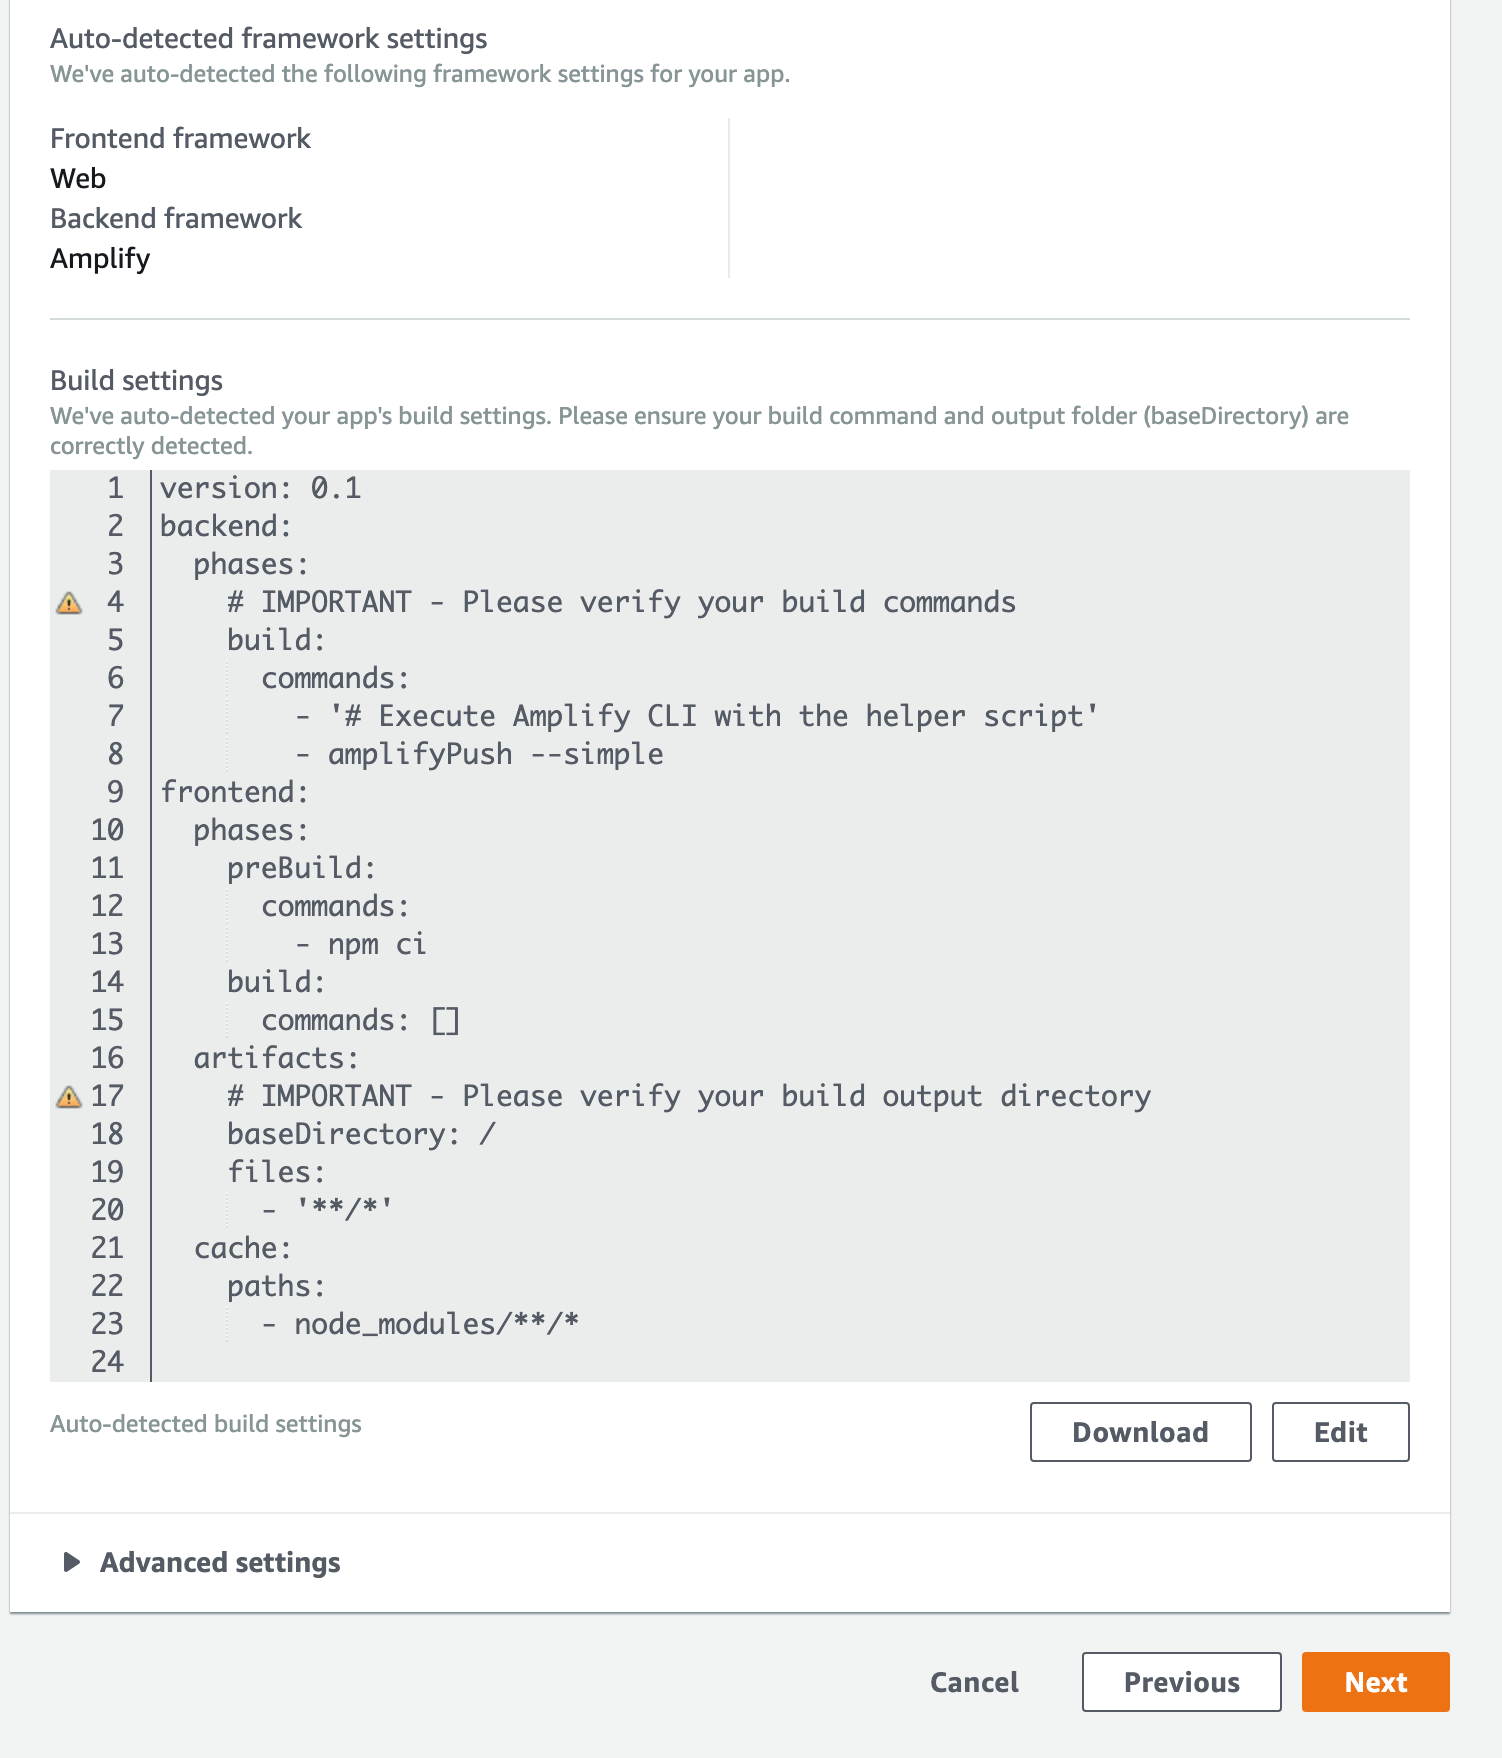
The Backend commands are fine, but we need to do several things to be able to build our Clojurescript application. You can edit it on the Amplify Console webpage (by clicking on Edit) and / or locally by downloading it and editing locally. In ether case we'll want to download it and put the amplify.yml file in the root directory of our repo.
(Note: Its not clear to me if we really need the file on the console if we have it in our repo. It seems that the one that is in your repo will supersede the one here on the Amplify Console)
- Install
- Java
- Leiningen
- shadow-cljs
- Add the following to the frontend prebuild commands:
- Set the base directory to where shadow-cljs puts the build assets
- Set the frontend build command
frontend: phases: preBuild: commands: - amazon-linux-extras enable corretto8 - yum -y install java-1.8.0-amazon-corretto-devel - java -version - curl https://raw.githubusercontent.com/technomancy/leiningen/stable/bin/lein > lein - mv lein /usr/local/bin/lein - chmod a+x /usr/local/bin/lein - lein version - npm install -g shadow-cljs - npm ci build: commands: [lein prod] artifacts: baseDirectory: resources/public/ - If all went well, you will eventually have a successful build / deploy
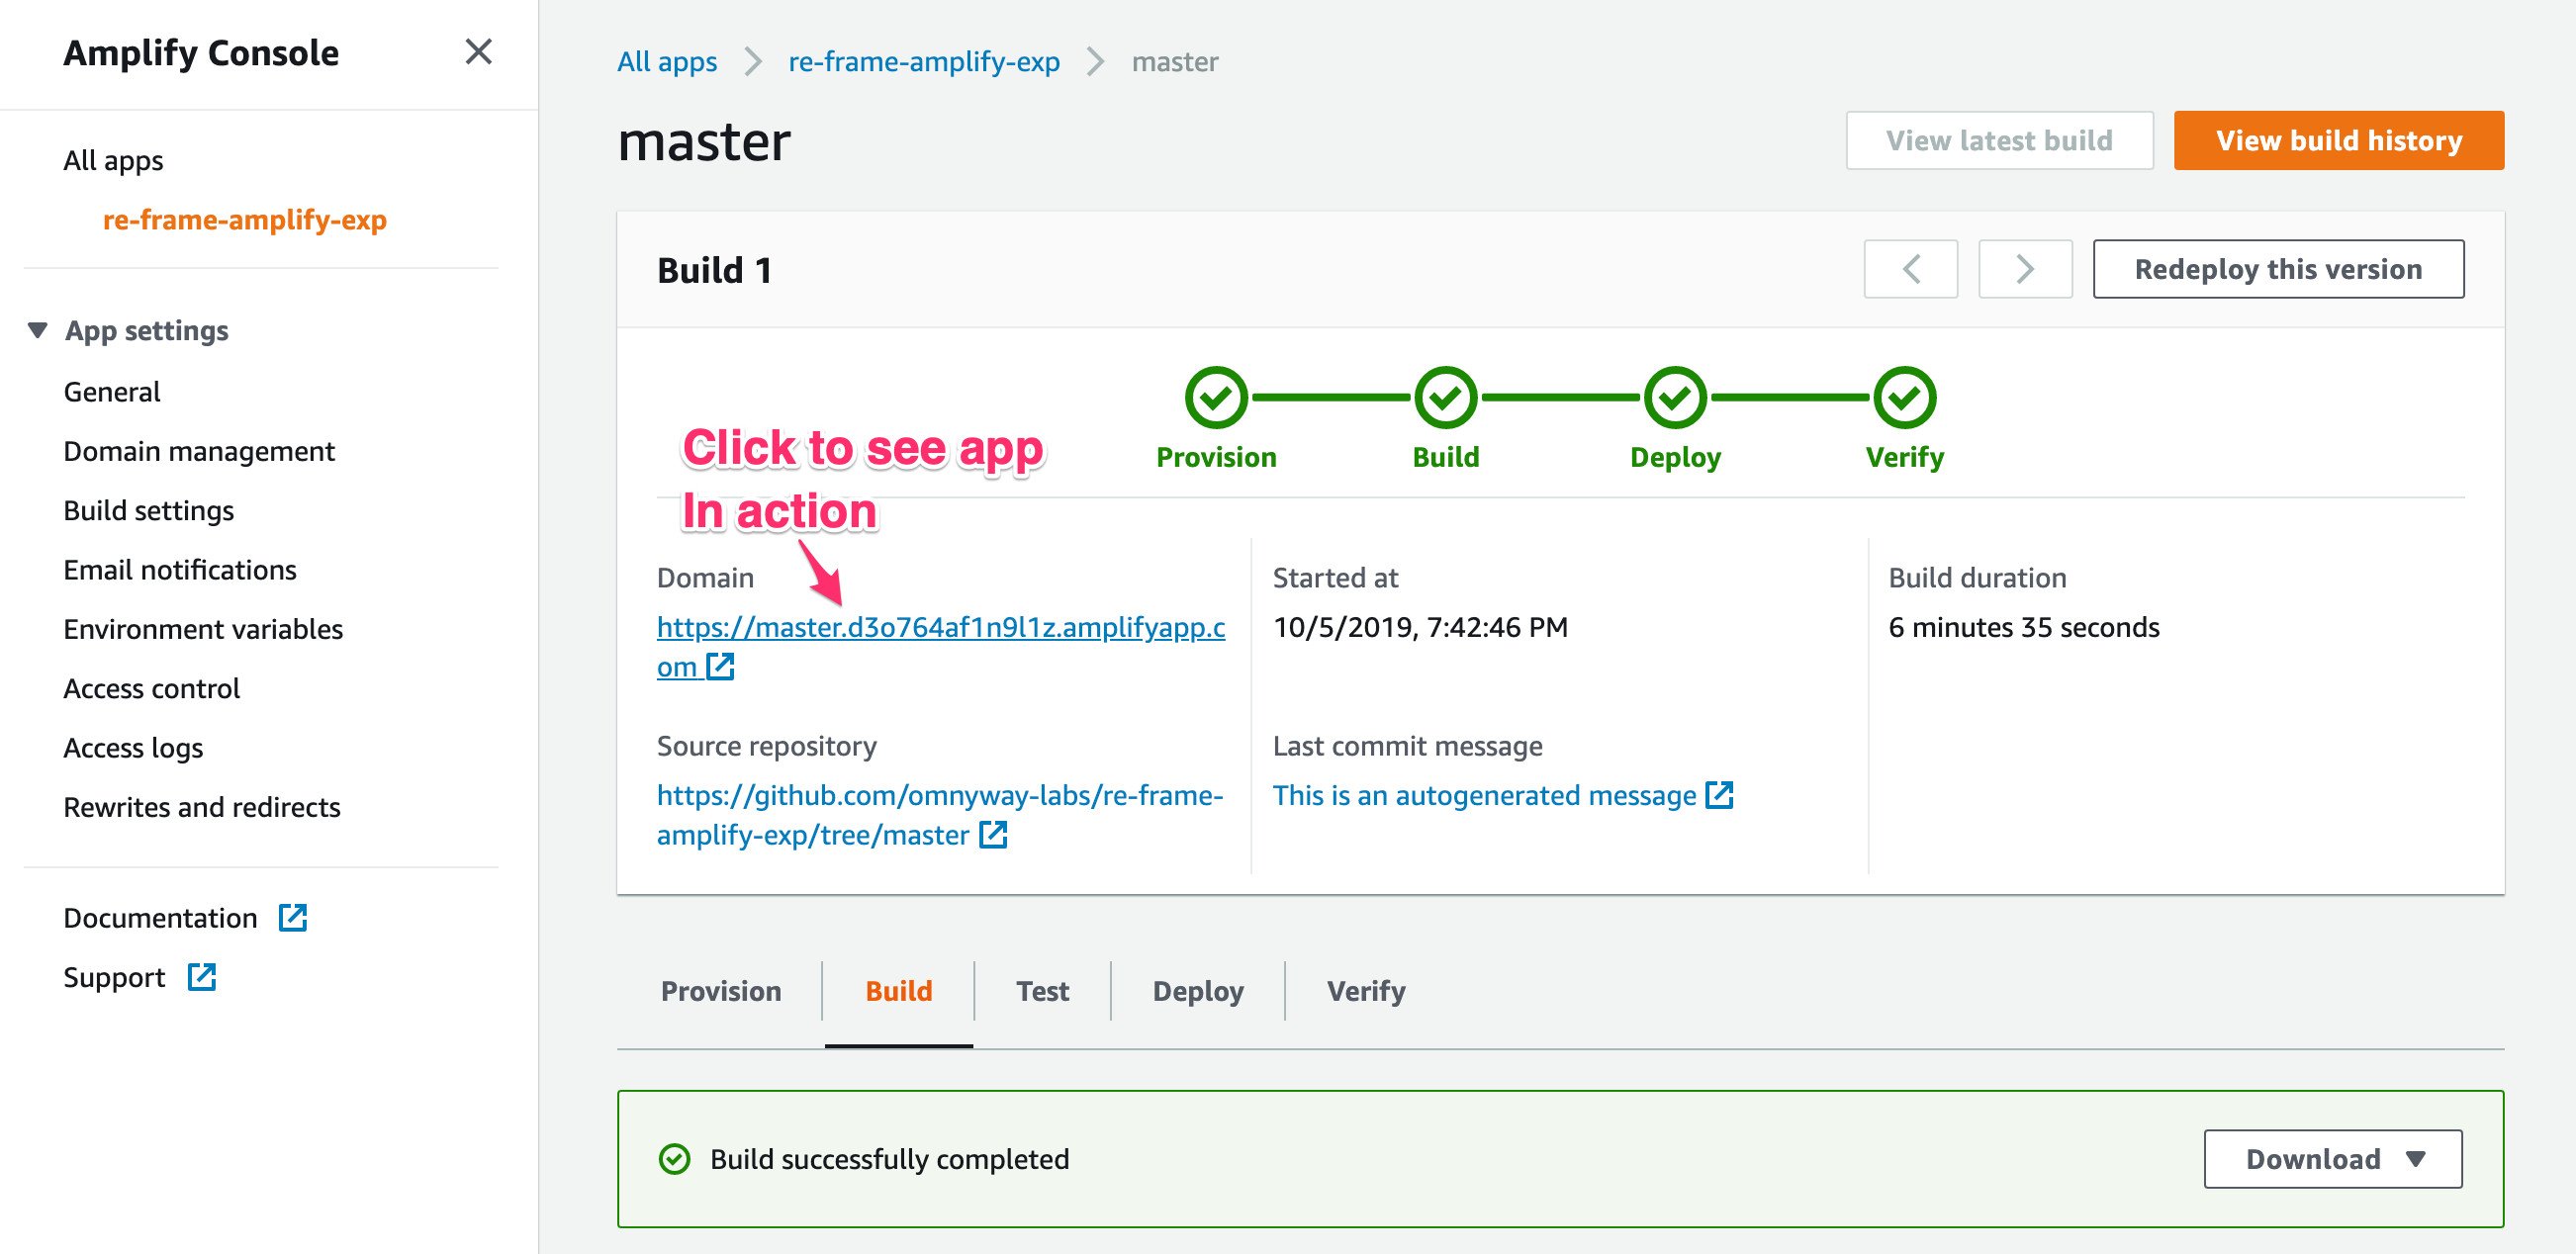
- Click on the Domain link to open the application
- Click on the Domain link to open the application
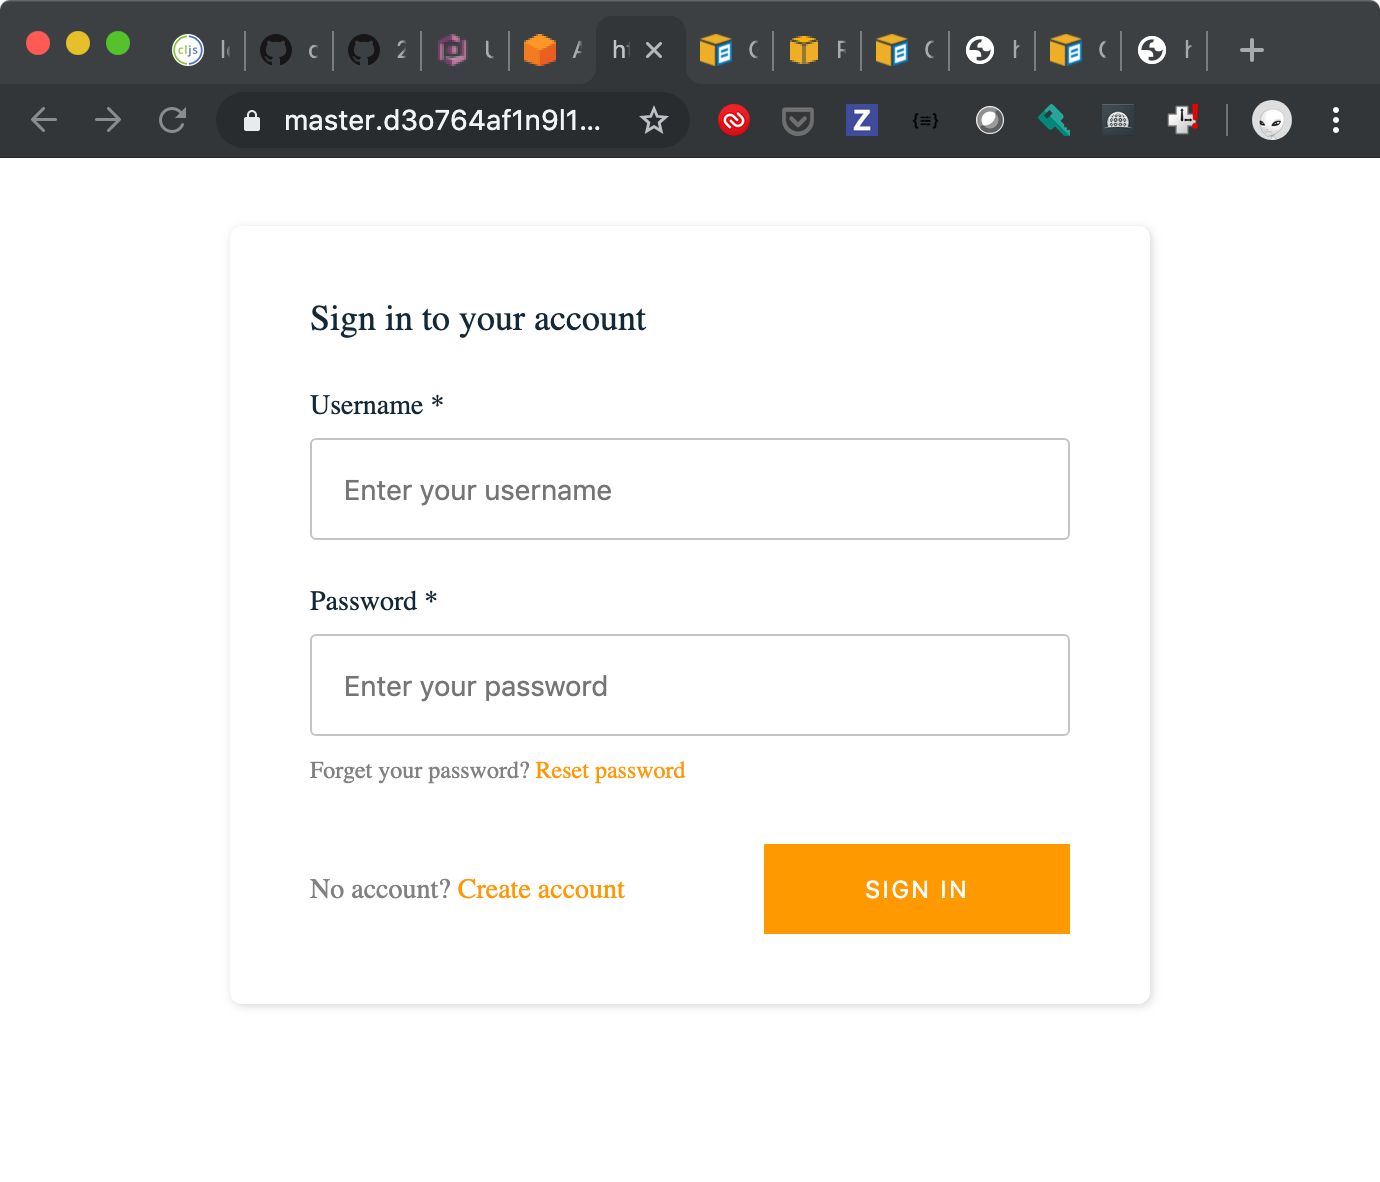
- The full features of the Authentication Lifecycle are now available
- Click on
Create accountto create an account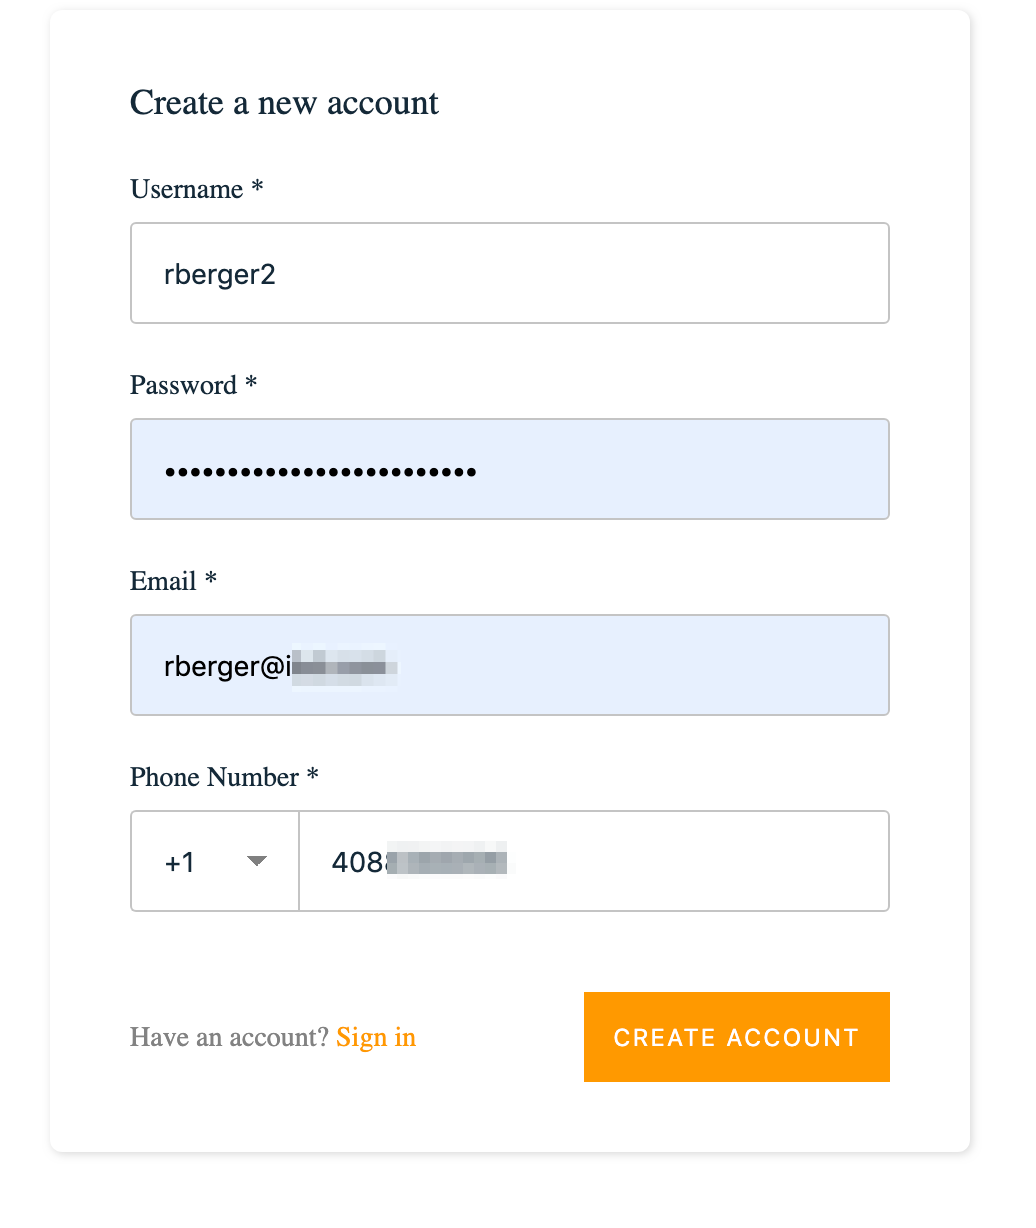
- The email needs to be a real email address you will receive as confirmation codes will be sent there

- The email needs to be a real email address you will receive as confirmation codes will be sent there
- Sign-in then with the credentials you had just created
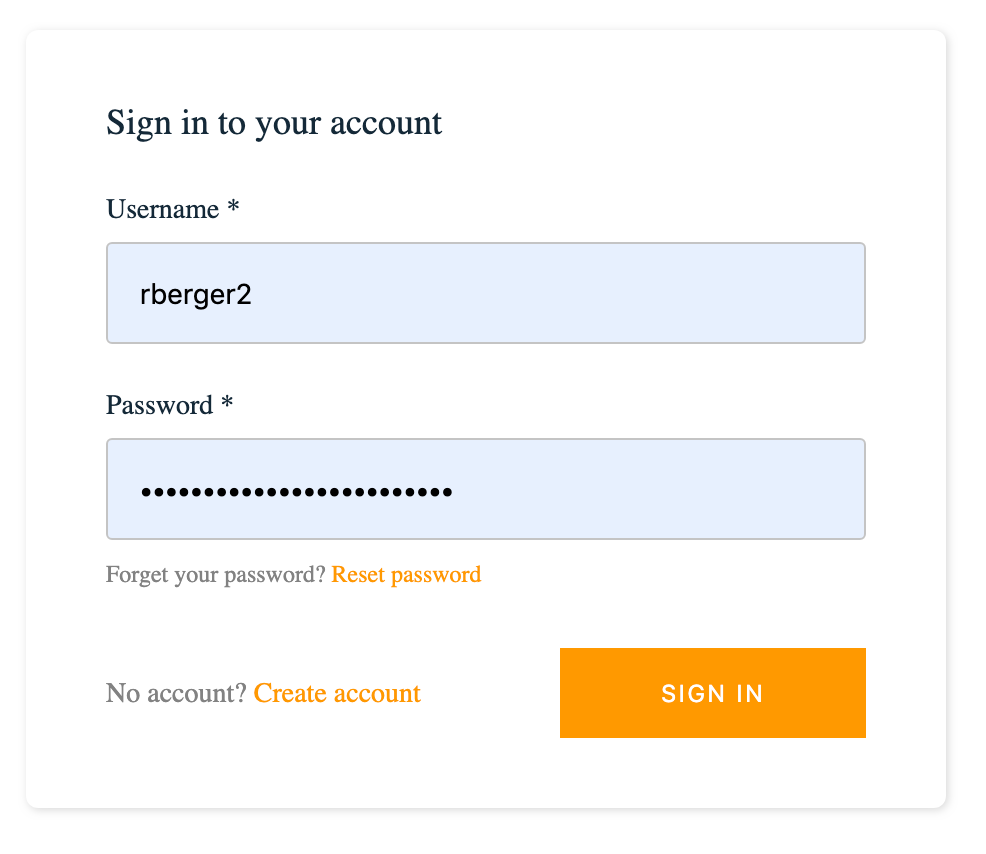
- And then you are in the app with the option to logout

- Click on
Set up Custom Domain
If you use AWS Route53 for your DNS management, the Amplify console can set up a custom DNS Domain and SSL Certificate to go with your new app!
If you don't use Route53, there is a way to insert a custom DNS but will not show how in this doc.
- Select the Domain Management option for the application you just created in the Amplify Console
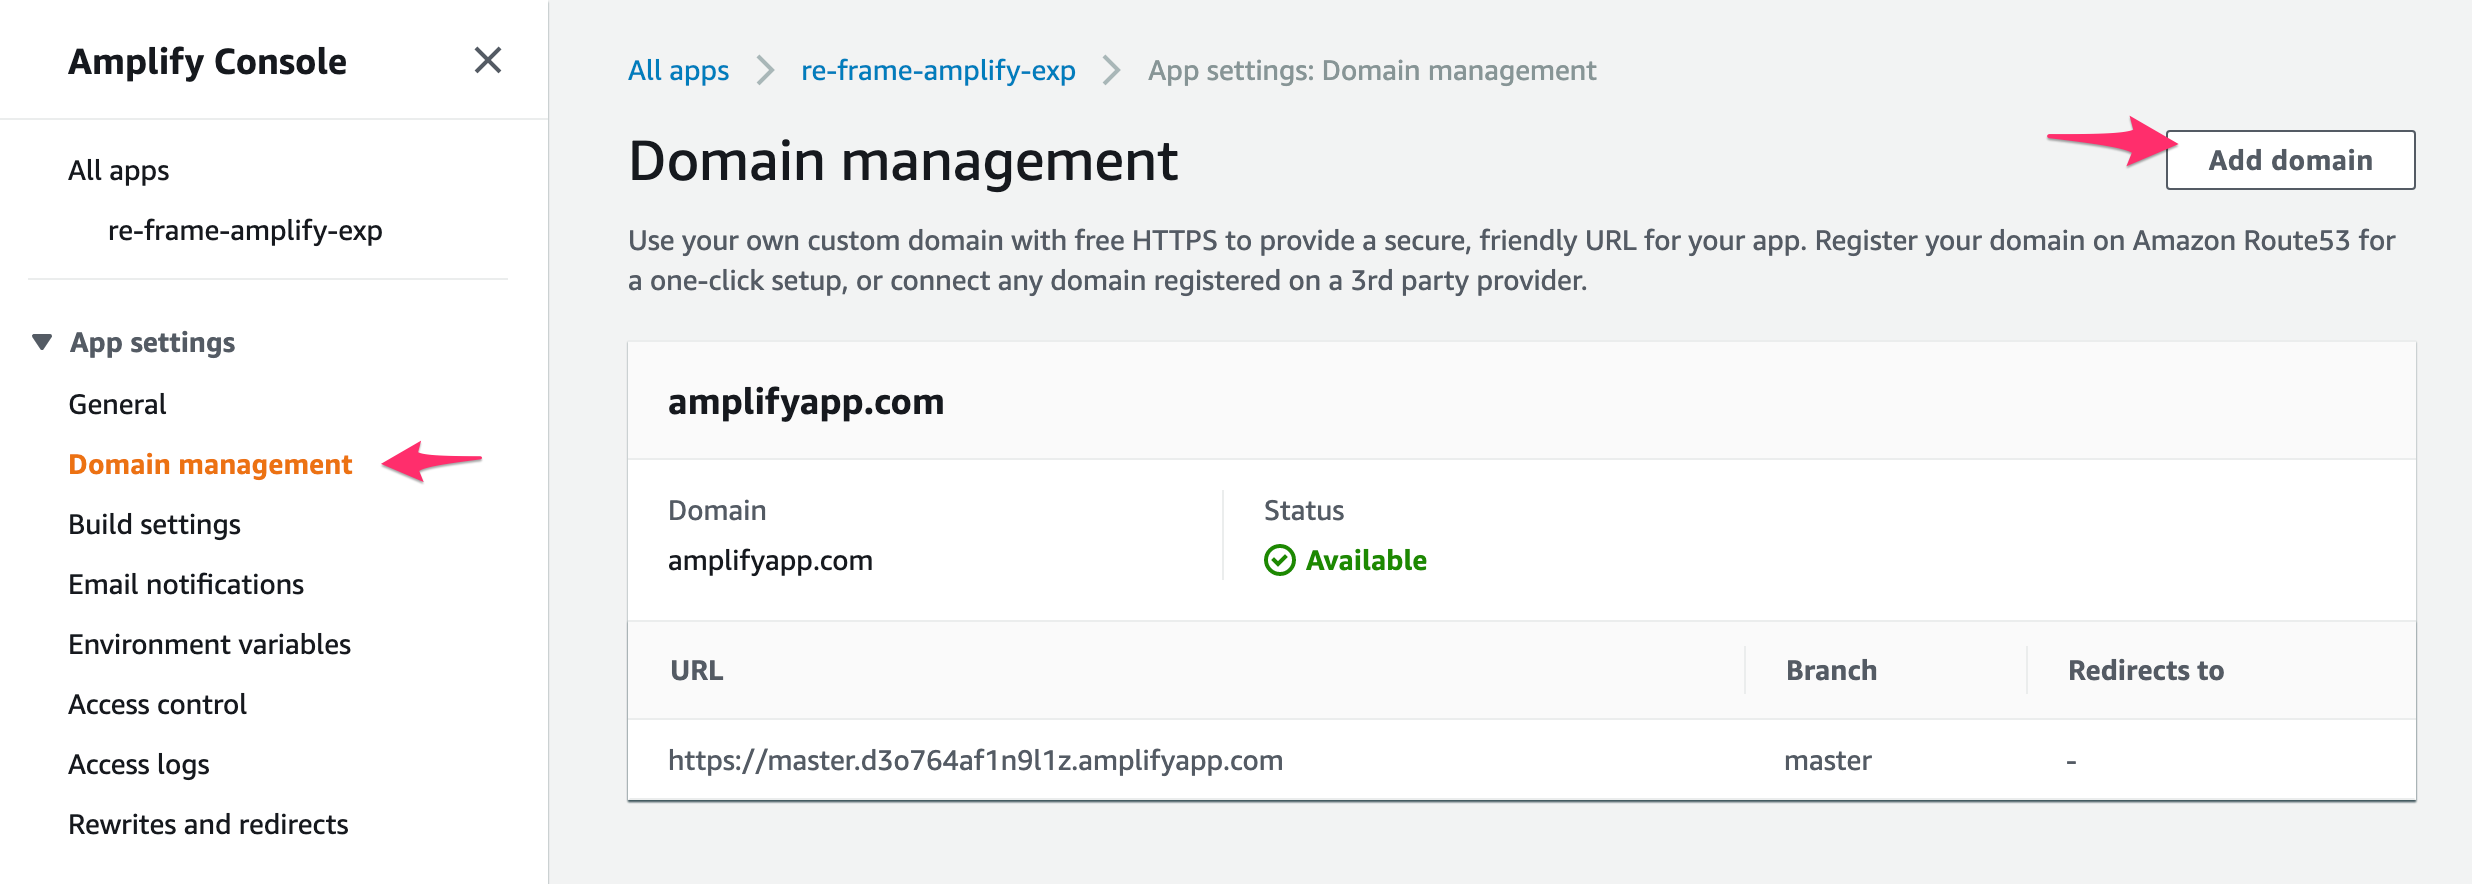
- Click on
Add Domain
- Click on
- Enter the root domain of the route53 zone you want to add this domain to
- We are using a domain zone (
lab.omnyway.net) that is a subdomain- The important point is it should be the domain that is a zone in your route53
- The Route53 zone probably has to be the same AWS account as the App
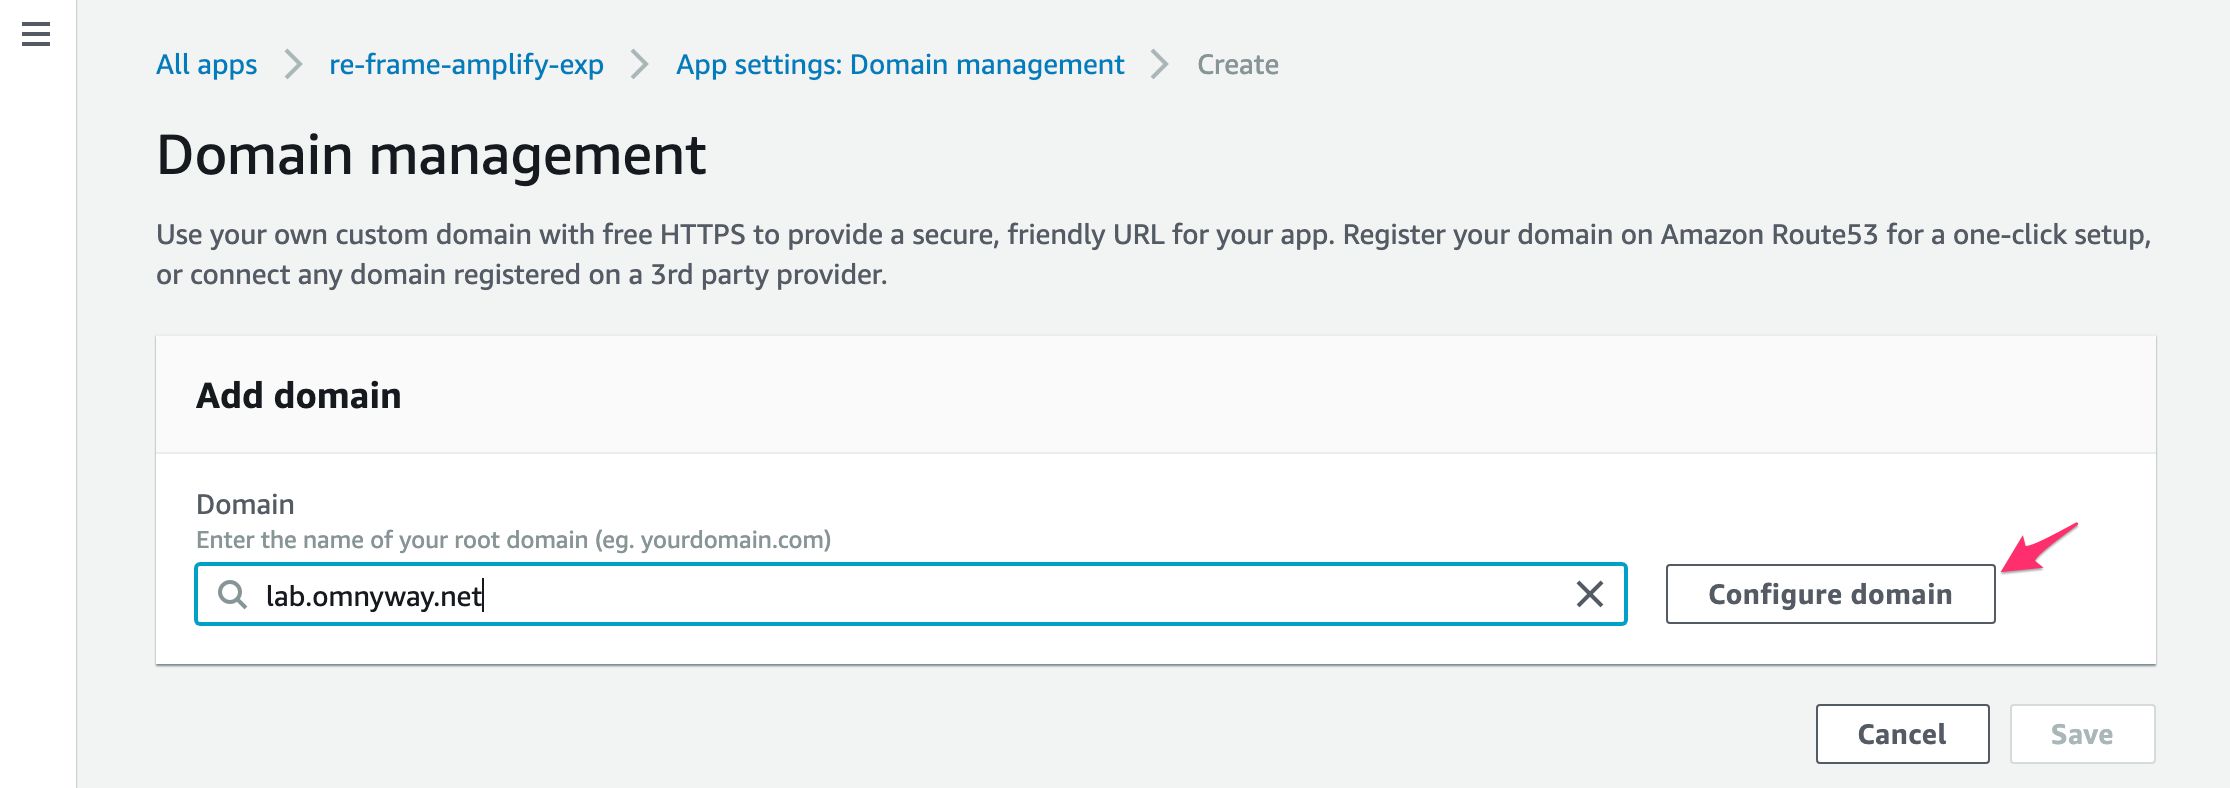
- Click
Configure domain
- We are using a domain zone (
- If this is the first time you use this feature, it has to first try some things to get authenticated.
- It will add a weird CNAME to the zone automatically. You don't have to do anything
- You could use the defaults if you want
- The root domain to resolve to your webapp
www.yourdomainto resolve to your webapp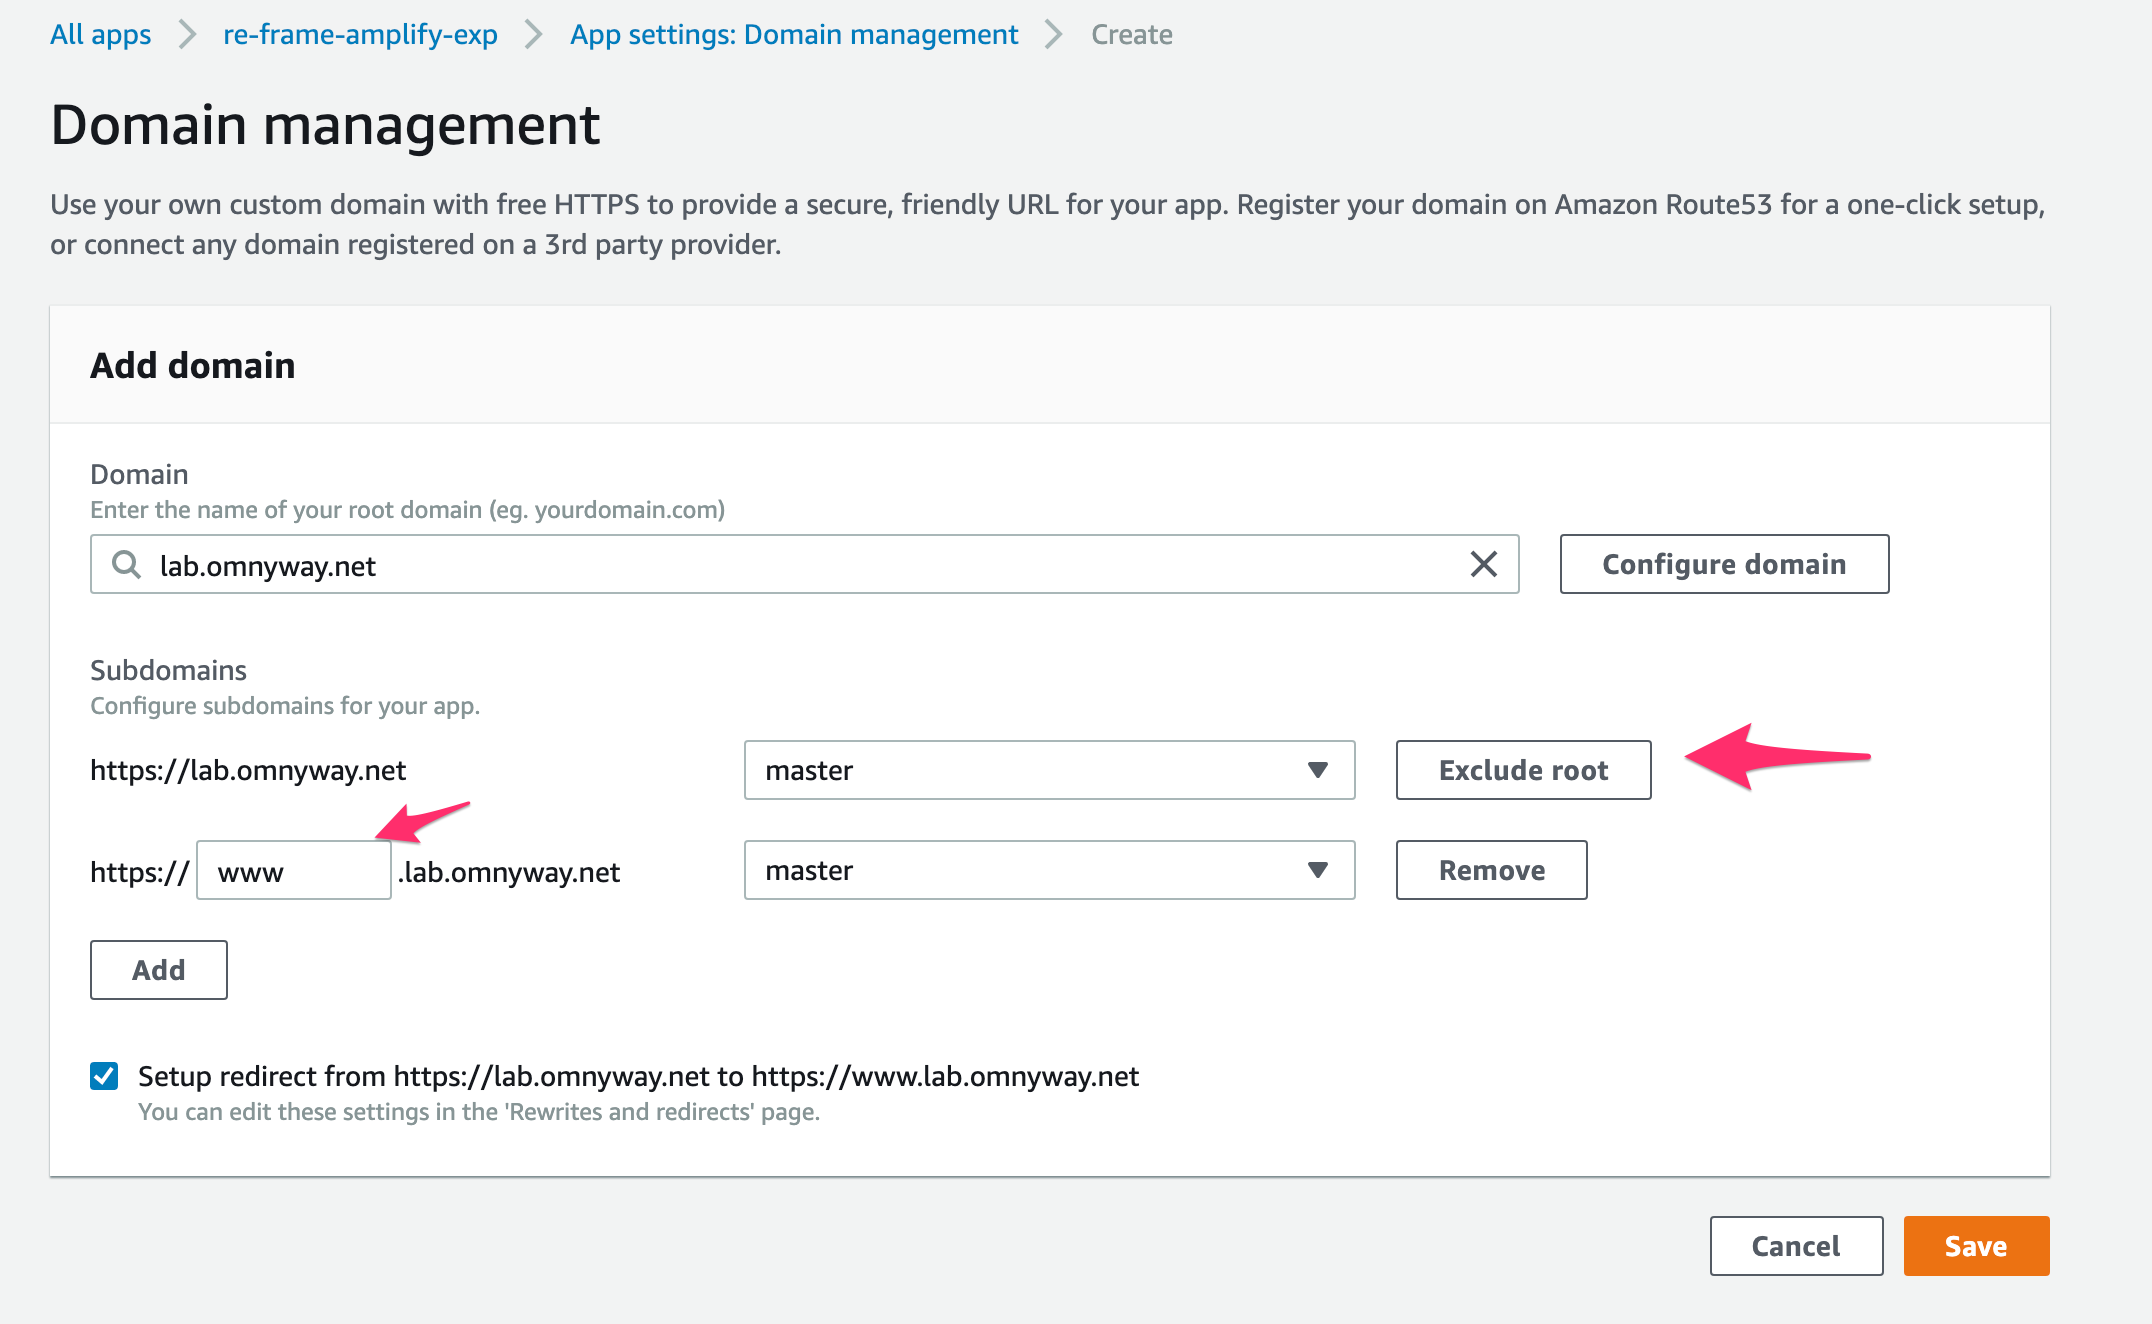
- But we have other things in this domain so we want it to just have a single domainname not
www- Click
Exclude rootso it turns toInclude rootand dims the pulldown - Replace
wwwwith the domain hostname you want.- In this case the name of the app
amplify_cljs_example
- In this case the name of the app
- Click
Save
- Click
- Assuming it all works
- It will add the CNAME to your route53 zone
- It will create an SSL Certificate and wire it all up
- Will get the domain fully activated
- You can then use the new url shown to access the webapp
Wrap Up
You now have an example of how to create and deploy a Clojurescript Re-Frame SPA with really nice Authentication capabilities with almost no coding.
The next article (Not yet written) will show how to use the AWS Amplify Authentication services to allow access to other standard AWS services.


